PS C:\>

Unleash your script

Windows PowerShell is a task automation and configuration management framework from Microsoft, consisting of a command-line shell and associated scripting language built on the .NET Framework.

Use MahApps.metro built-in dialogs

Apply beautiful modal dialog into your project.

How to apply a theme on your GUI?

Some tips on how to apply a theme on your GUI ...

Showing posts with label Powershell. Show all posts

Sunday, 14 October 2018

Click Event on Treeview


Sometimes PowerShell and WPF can be tricky to achieve what you want. Treeview controls is not making things any easier. Just for a simple click, you need to go through a lot of trouble.

Before continuing reading, let's introduce some variables:
$treeviewItem is a TreeViewItem controls ([Windows.Controls.TreeViewItem])
$TreeView is the TreeView controls that holds several TreeViewItem.
If you want an example of a TreeView, you can check out this link.

How about using Add_MouseDown({}) ?

You have the MouseDown() event, but it doesn't work pretty much like how we want it. Looks like some issues with WPF they say (on MSDN).  They instead propose to use the "Preview ..." event version. So let us forget about this option! Well, I had no complaints, so I just used the method they proposed.

How do I use those "Preview" thing methods?

When you use the method on your TreeView, just add preview right before like this:
$TreeView.Add_PreviewMouseDown({})

You can see that when you click inside your control, there is always an event fired even if it wasn't a node that you clicked. That's the normal behaviour of the method. However, that's not likely what we want. We just need an event to be fired when a node is clicked.

What should be done to make it works?

Instead of the TreeView itself, you have to assign the method to each TreeViewItem Control. Like this:
$treeViewItem.Add_PreviewMouseDown({
  Write-Host "Preview Mouse down " $_.OriginalSource
})

If you haven't done any graphical customization inside your XAML [used a DataTemplate or something else], this should work. Otherwise, you would say: "What the heck is this dude? It doesn't even work! 😠"

Don't worry! To make it works, you need to collect the right type of Data, which is a [Windows.Controls.TreeViewItem]

By default, This:

$treeViewItem.Add_PreviewMouseDown({
  Write-Host "Preview Mouse down" $_.OriginalSource
})

Equals to this:
$treeViewItem.Add_PreviewMouseDown({
 [System.Windows.RoutedEventArgs]$e = $args[1]
 Write-Host "Preview Mouse down " $e.OriginalSource
})


It returns the source of the event, not the TreeviewItem itself. In some ways, you can directly use this solution depending on what you want to achieve. 

But it's better to say to our script: "Hey give me the right stuff!"
For that, we need to tell Powershell what kind of control he should be waiting for.
Basically, we need to say: "Give me the treeviewItem related to the control I clicked."

To achieve this, you need to do some little modification:


$
treeViewItem.Add_PreviewMouseDown({
  [System.Windows.Controls.TreeViewItem]$sender = $args[0]
  [System.Windows.RoutedEventArgs]$e = $args[1]  
  Write-Host "Node clicked: " $sender.Header
})


This way, we can get the "sender" control and we can manipulate it the way we want.


So this is it! You shouldn't have any trouble with your Treeview now.


Want to go further?

If you want to enable right or left click only, just replace the method with:
Add_PreviewMouseLeftButtonDown({}) for left click
Add_PreviewMouseRightButtonDown({}) for right click

Next post will be some drag and drop event with WPF/PowerShell.
Thanks for reading! That's all folks! 😉


Share:

Monday, 16 April 2018

PowerShell WPF - Customize TreeView Icon


       I have seen many people struggle with this so I decided to write something about TreeView in PowerShell. 

The script in this post is based on the project available here (written in C#). I simply rewrote it in PowerShell and added my personal touch.  He displayed a drive image if the TreevieItem was a drive and a folder image otherwise. I extended the principle a little; you can specify directly in your script which kind of image you want to use in which case.


Share:

Thursday, 12 April 2018

Window LifeTime Events in PowerShell


       In this post I’ll explain the lifetime of your window from the moment it is initialized and the moment it's destroyed. I hope this post will help you achieve easily what you seek and could be time-saving in some case.

What I’m going talk about here?

«To find it you must look beyond what you see» Rafiki
Everything has its lifecycle 😊. So does your window in PowerShell. It follows the same rule as in C# when you load it in PowerShell. It’s well explained here.


Share:

Monday, 9 April 2018

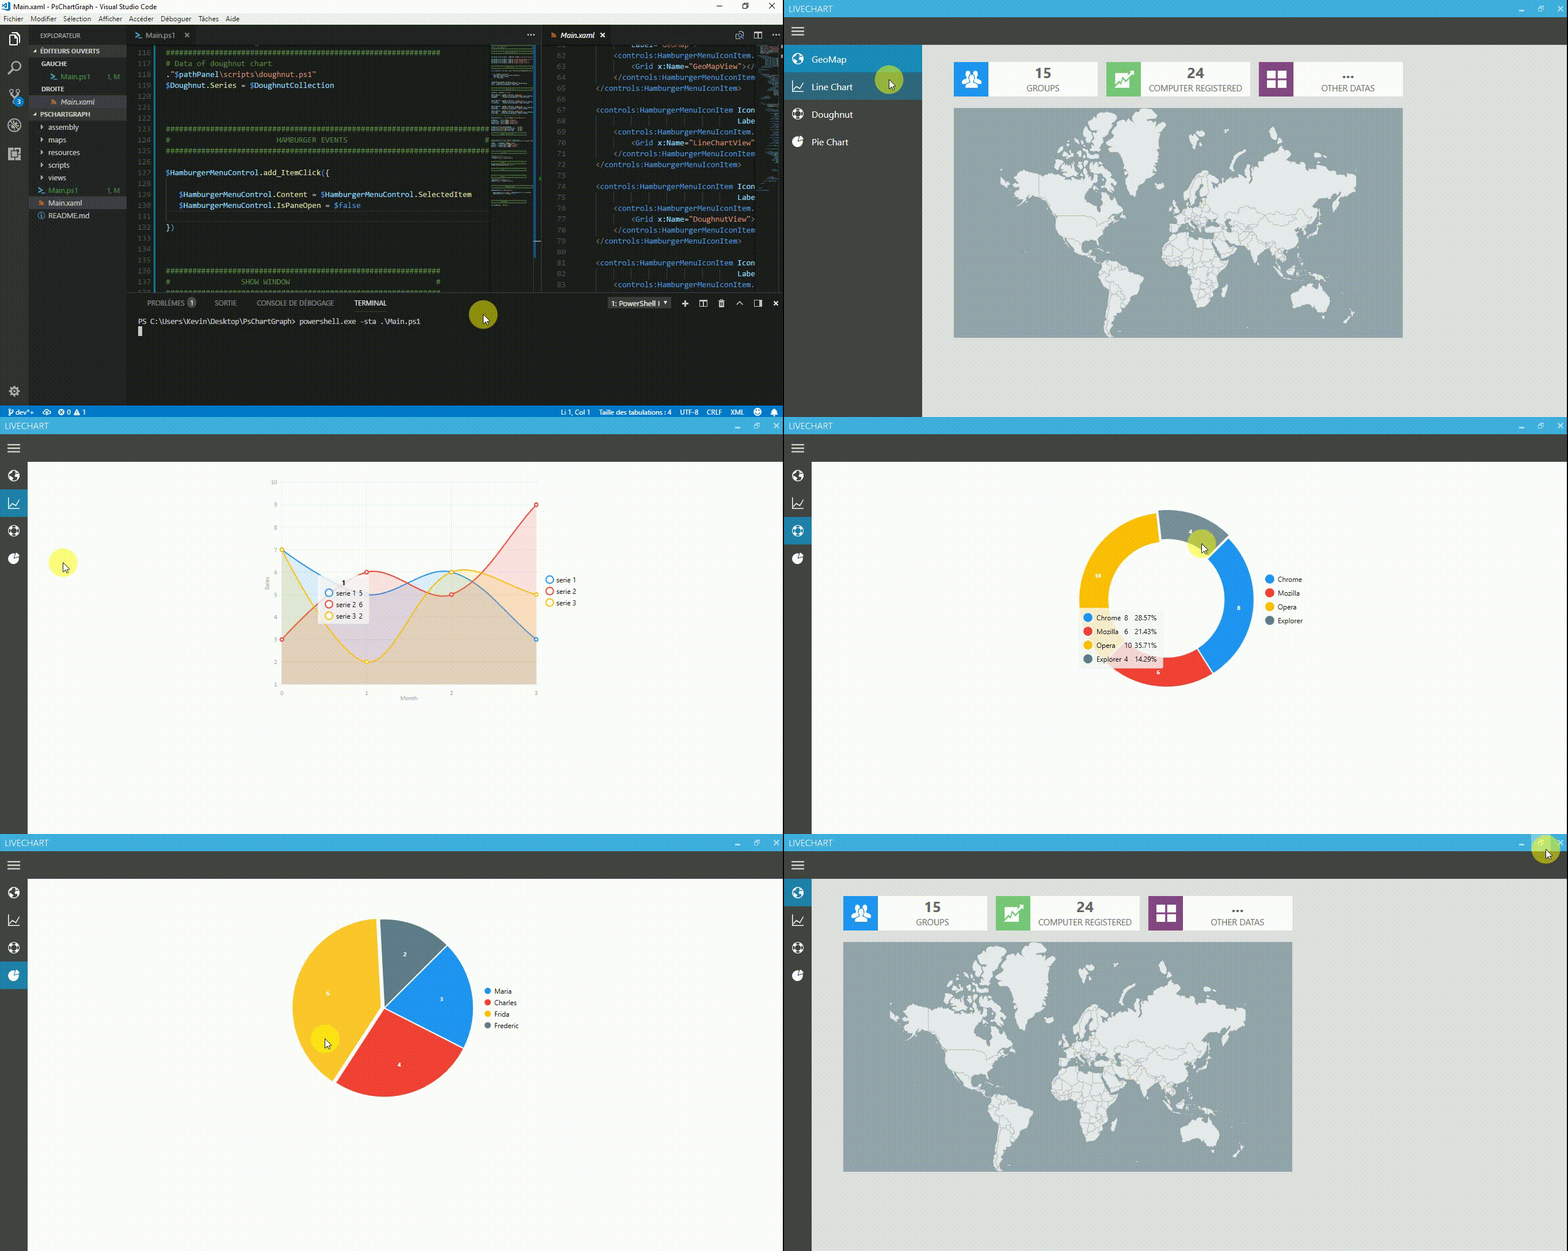
PowerShell_Charts - Introduction to LiveCharts


As we all know flat design is the new black with material design and etc. So basically we are following the trend here.

Displaying graph does not escape this rule. Personnally, I wanted to do something about this for a while but I had no idea where to start. I wanted something compatible with MahApps, WPF, PowerShell and be “pretty” at the same time. And then I found this website:


So I began my little research and found nothing on the web L or maybe I was unlucky. I started testing the assembly and what a surprise! It works pretty well with Mahapps and WPF!

You can see a little preview of the graph in action here:


The only problem is the “type” of data passed to those graphs. It’s quite difficult to understand for a non-developer. So I came up with the idea to start a series of tutorials for each graph presented on their website and how to handle them in PowerShell.


I’ve not yet tested the “Material design” but it should come really soon on this blog too.
The source code of the preview is available in my git repository for those who can't wait.
See you next time! 😉


Share:

Monday, 2 April 2018

Powershell_WPF - Part V - Display Dynamic content


In this post, I will show you how to add dynamic content inside a WPF window in PowerShell. Most of the time, we display dynamic data inside a Datagrid or a Listview, but what if we want to create our own display for each item? 

Recently I came across this post: Let’s play with SNCF API and Powershell!” written by Etienne Deneuve. You can get a list of the next train in a specific train station.

What‘s that got to do with us?

The answer is simple, this script will return a dynamic result for each query. And that’s a good example to use. Here is a window with a datagrid to show what we have done up until now, and a new block to show what could be done with a dynamic display.


Share:

Monday, 26 March 2018

Add multiple buttons in Datagrid


If you are reading this, that means you wanted to add a button inside a Datagrid in PowerShell. 
Let us suppose that you need to add one or multiple buttons inside a single column in a datagrid. Data will be loaded inside the gridview and at the same time: n-number of command buttons need to be added to each row. Something like this:


Share:

Monday, 19 March 2018

Mahapps Custom Dialog


When you design your apps, sometimes you need to add a custom content to your dialog form. In this post, I'm going to show you how to create your own custom dialog with PowerShell using Mahapps.

Here is a preview of the result:


You can put whatever content you want inside the dialog. Each dialog in the picture is a custom dialog.

Share:

Monday, 31 July 2017

Find missing driver or disabled device


At one point of our life, we all had an issue with a missing driver on our computer. A problem with the display not shown correctly because the driver installed is not the appropriate one. A problem with a network card or embedded WIFI card and so on …


GitHub link for this project:
Share:

Monday, 24 July 2017

Using MahApps built-in dialogs with PowerShell


Keeping up with the MahApps.Metro theme, this time I’ll show you how to use the built in Dialog with our WPF window.
When you are looking at the guidelines on the MahApps website they explained how to use asynchronous dialogs (Message Dialog, progress dialog …) with async/await.

Unfortunately, it isn’t available in PowerShell because the UI is using the main thread and managing another thread in PowerShell like other programming language is a little bit frustrating.

I struggled to find a way to make it work with runspacepool and other stuff … but in vain. I was about to stop this project and then I found this.


They made an update in the latest release (1.5.0). New methods are available and we can use them with PowerShell.

These are the two types of dialogs available:
-  internal dialogs
 external dialogs

All the async methods are internal dialogs. Technically you can use them but you cannot get the result. You can try it if you want and test your code with the ShowMessageAsync() method.

External dialogs are a bit different. The UI synchronously waits for the dialog before proceeding, so we can get the result.

All dialogs are available in a Class DialogManager:
[MahApps.Metro.Controls.Dialogs.DialogManager

How do we use it?


First, find the button or the control on which you want to attach the event.
I added a textbox in which I store the result.

$btnOpenDialg      = $ExternalXaml.FindName("btnOpenDialg"
# TextBox for result
$dialgResult       = $ExternalXaml.FindName("dialgResult"

There is nothing to do in the xaml file, everything is managed in the script. I chose to use the “OK/cancel” example because this is the most popular used by people 😊.

The next step is to add the action when a click event occurs.


So to show the message, you call the method inside the dialogManager Class, and that’s it. There’s three mandatory parameters though:
$Form (Your main Form), title and message(otherwise there’s no meaning to it). At least like below then

[MahApps.Metro.Controls.Dialogs.DialogManager]::ShowModalMessageExternal($Form,"Title","Your message. ")

And that’s all. Now you can say goodbye to the old MessageBox and use this new one. 😊

Where to download?


I made a complete project here, with the hamburger menu if you want to download.


Share:

Monday, 17 July 2017

HamburgerMenu V2 with PowerShell


Since my last post «MahApps HamburgerMenu & PowerShell», some people asked me on how to use the version with an image and not the canvas resources available in Icons.xaml.

To achieve this, in this post I’ll show you:
- How to set up your project files.
- What needs to be changed compared to the previous version.

Here is a little preview of what you’ll get at the end:


Share:

Thursday, 13 July 2017

Mahapps.Metro HamburgerMenu with PowerShell


I started a long time ago making a tutorial series about using WPF with PowerShell. For theming my apps, I always use Mahapps and really like this theme. This time I’d like to introduce a new Control available in their latest release: the “HamburgerMenu Control”.

As introduced by Jan Karger in his blog: “since v1.4.0 of Mahapps.Metro contains this new control which is mostly the same as the one from the UWP Community Toolkit”.

In this post, I’ll show you how it works and how to use it with PowerShell. So, at the end of this post, you should have something which looks like this:


Share:

Sunday, 9 July 2017

How to pass arguments to a powershell script?

It’s been a while folks. Recently, a colleague of mine asked me how to pass argument(s) to a PowerShell script and how does it work. I even come across the same problem when I started PowerShell so I decided to write something about it for those who may need.

Let’s dig into the subject:
Basically, you want to achieve something like this:

.\Powershell.exe “C:\myScript.ps1” -args1 “value1” -args2 “value2” […]  -optional1 -optional2 […]

With as many arguments and optional switch you want.

How it is done?


Edit your script and at the head of your file before everything add the following lines:


The statement:

Param(): declares parameters that will be used, pretty obvious.
[Parameter()]: specifications about the parameter if it is mandatory, its position …
[string] /[int] /[switch]: parameters type.

Share:

Tuesday, 2 August 2016

Friday, 3 June 2016

Powershell_WPF - Part III - How to load a splash screen


What is a splash screen?
A splash screen is a graphical control element consisting of window containing an image, a logo and the current version of the software. A splash screen usually appears while a game or program is launching. According to Wikipedia J

That says everything there is to say. There’s nothing more to add I think.
More specifically, it's something like we see below:


What has that to do with us?

Well, you certainly had spent your time in scripting and writing tons of code in powershell and you found it funny. But at a certain point, you probably realize that the longer your script is, the more time it takes to load.
And before your computer, when you load your script, you’re like:


To sum up, if your application is too big, it will take time before your entire GUI is loaded and and you don't really want your user to wonder "hey! what's going on?". That’s where splash screen plays its role.

The idea of a splash screen came to me when I was asked to create a tool that wrapped ImageX for creating a WIM image. I realized that my tool took too much time to load and I needed something to keep the user busy.

How do we do it in Powershell?

The tips is: runspace

We are just going to use a runspace to load a second form before loading your code and close it when it’s finished. That is the big idea behind. You may be saying: what the heck is he talking about?
I only have a shallow knowledge about runspace too but, all I can say is that it’s really helpful when you want to do multi-threading (to have many processes working at the same time - in noobs way of speaking J).

In my previous post how to apply a theme in Powershell, I introduced Mahapps which uses a metro theme. We are going to use one of the component included in that theme for creating the splash screen. I think you’ve guessed it already: it’s for the progressbar in the splash screen.

Let’s move on to the code.

How to use the splash screen?

You just have to copy and paste the following code in your main ps1 file at the top. This way the runspace which contains the second form will be loaded before everything and can be called at any time inside the script.


If you want to add your logo and text, just edit:
$hash.Logo.Source=".\form\resources\powershel64x64.png"
$hash.LoadingLabel.Content= "Your Code is loading"  

As you can see, there are two functions:
- Start-splashScreen
- Close-splashScreen

Those functions are used to open and close the runspace.
You just have to put Start-splashScreen before the script block

Start-SplashScreen

try {

########################
# your incredible code
########################

}
catch{
    $ErrorMessage = $_.Exception.Message
    Write-Host $ErrorMessage
}

It’s better to use a try and catch if your code potentially generates error. So the splash screen will be closed in any case at the end.

And at the end of your file, before you call ShowDialog() on your form, or when the code you wanted to be executed is finished, close the splash screen.

close-SplashScreen
$Form.ShowDialog() | Out-Null

Of course, as you could understand, you can use a splash screen for many purposes. Let your imagination take you away.

Here is a little preview:


You can download all files here
And that’s it for this third part, hope you enjoyed it. J And see you in the next part

Share:

Monday, 30 May 2016

Powershell_WPF - Part II - How to apply a theme


      In this post I’m going to explain how to apply a theme on your GUI.There are many themes available on the web that you can apply on your WPF form. However, it’s solely explained for C# language use. In our case, we need it for powershell so how do we do it?
Don’t worry anymore! We are going to fix this. J I’ll show you how to integrate two kind of themes in this article.

  • First is based on the use of XAML resources
  • Second is based on dll resources assembly
For the first one, there is an interesting pack of theme from stanislawswierc that you can find here: https://www.nuget.org/packages/Wpf.Themes/ 

And for the second, it’s a project started by Paul Jenkins which uses a Metro theme. You can find it here:  http://mahapps.com/ . To use its full potential you need to have .NET framework 4.5 installed on your computer.

One thing I haven’t introduced in the first Part of this series is the use of StackpanelThe StackPanel is a simple and useful layout panel. As its name imply, It stacks its child elements below or beside each other, depending on the orientation. That coupled with HorizontalAlignement and VertcalAlignment properties; it becomes easy to handle elements.
You don’t have to specify explicit value for element’s position, it will automatically fits the space available. It will become very handy when we will create dynamic GUI later.

I’m going to use the same ps1 file as in the first article "How to create a GUI" ,and here's the GUI that I'm going to use:


Let’s begin!

Part 1: XAML resource

First, How to get the theme?
Launch visual studio, create a new WPF project and open the package manager console
Tools > Nuget package Manager > Package Manager Console

And copy this line into it:

PM> Install-Package Wpf.Themes

Now you should have something like this


      And you can see in the "Solution Explorer" window at your right that a new folder Themes containing different XAML files has been added in the treeview. 


For now, we are on the right track. Now, Browse to your project’s files location and copy the "Themes"  folder that has just been created to the location of the xaml and ps1 you want to apply the theme. At this point, you should have something like these in your project folder:
Now, that we have everything we need, we can edit our xaml. Before, editing your xaml, make sure that your form appears normally and that no error pops up of the powershell console.
In your xaml file, right after the Window tag add the following lines:

Those lines are used to tell that some external resources will be used in the form.

As you can see here, we’re using the Bureau Blue theme located in the folder Themes as resources. And that’s all you needed to apply the theme. Fast and easy!

Here are some previews of the themes provided:


Part 2: Dll resources

Now let’s move on, here we are going to use dll resource for our theme. This is the theme I like the most: Mahapps.

Again, open visual studio and create a new WPF project, and load the package manager console: Tools > Nuget package Manager > Package Manager Console

And copy this line into it:

PM> Install-Package MahApps.Metro

To install this package, you should have at least version 4.0 .NETframework. To change the version of framework of your project, double clisk on Settings in the Solution Explorer; a new window will appear and change the target framework to 4.0. If you chose, higher version of framework when creating the project, you can skip this step.


You should have this message in your package Manager console after executing the package installation.


Browse to where your Visual studio project is saved on your disc and open this sub-folder:

.\packages\MahApps.Metro.1.2.4.0\lib\net40

You should see these files:
Copy MahApps.Metro.dll and System.Windows.Interactivity.dllCreate a new folder in where your ps1 file and xaml is and rename it to “Assembly”. Paste all the *.dll in this new folder.

Edit your Ps1 file and paste the following lines at the top: 

Also, edit this line if you have renamed your xaml file:

In my case, I renamed it into “window.metro.xaml”.

In your XAML, replace:

With

Don't forget to do as well with the "window" closing tag.  

After the window tag paste these lines:

If you are unlucky, you’ll have this error J when you try to execute your scripts:

Could Not Load Assembly: Operation not supported (Exception from HRESULT: 0x80131515)

Don't worry! This is a normal issue. The dll file is just blocked, this sometimes happens if the file comes from another computer.

To solve the issue: For both files, you need to open the file properties > go to general Tab > Security > check unblock and apply.


If you launch it again you should have something like this:


It's beautiful don't you think? I suggest you to go take look at their website, to see what you can do with other controls.

You can download all files used in this post here.

That ends this little topic. If you have any question, you can leave a reply or send me an e-mail, I'll answer as soon as I can. Thanks for reading and see you in the next part. J

Share:

Popular Posts

Join us on Facebook

STATS

Contact Form

Name

Email *

Message *

image
Hello,

Thank you for visiting my blog and reading this far.

I'm mainly focusing on scripting, software development and modern workpalce experiences with Microsoft Technology. I created this blog for the main purpose of sharing my knowledge. Hope you will appreciate my works and will help you in yours. You are friendly invited to leave any kind of feedback in the comment sections of my posts.

Please note that all posts on this blog are my own opinions and are provided "as is", without warranty of any kind.